Skip to main content

Case studiesLive implementation

Real-Time Alert & Signal Terminal

A signal screener you can run locally in minutes: filterable feed, mini charts, expandable analysis, and built-in strategy markers. Download the zip, edit React files, and connect your alert backend.

Open the live screener

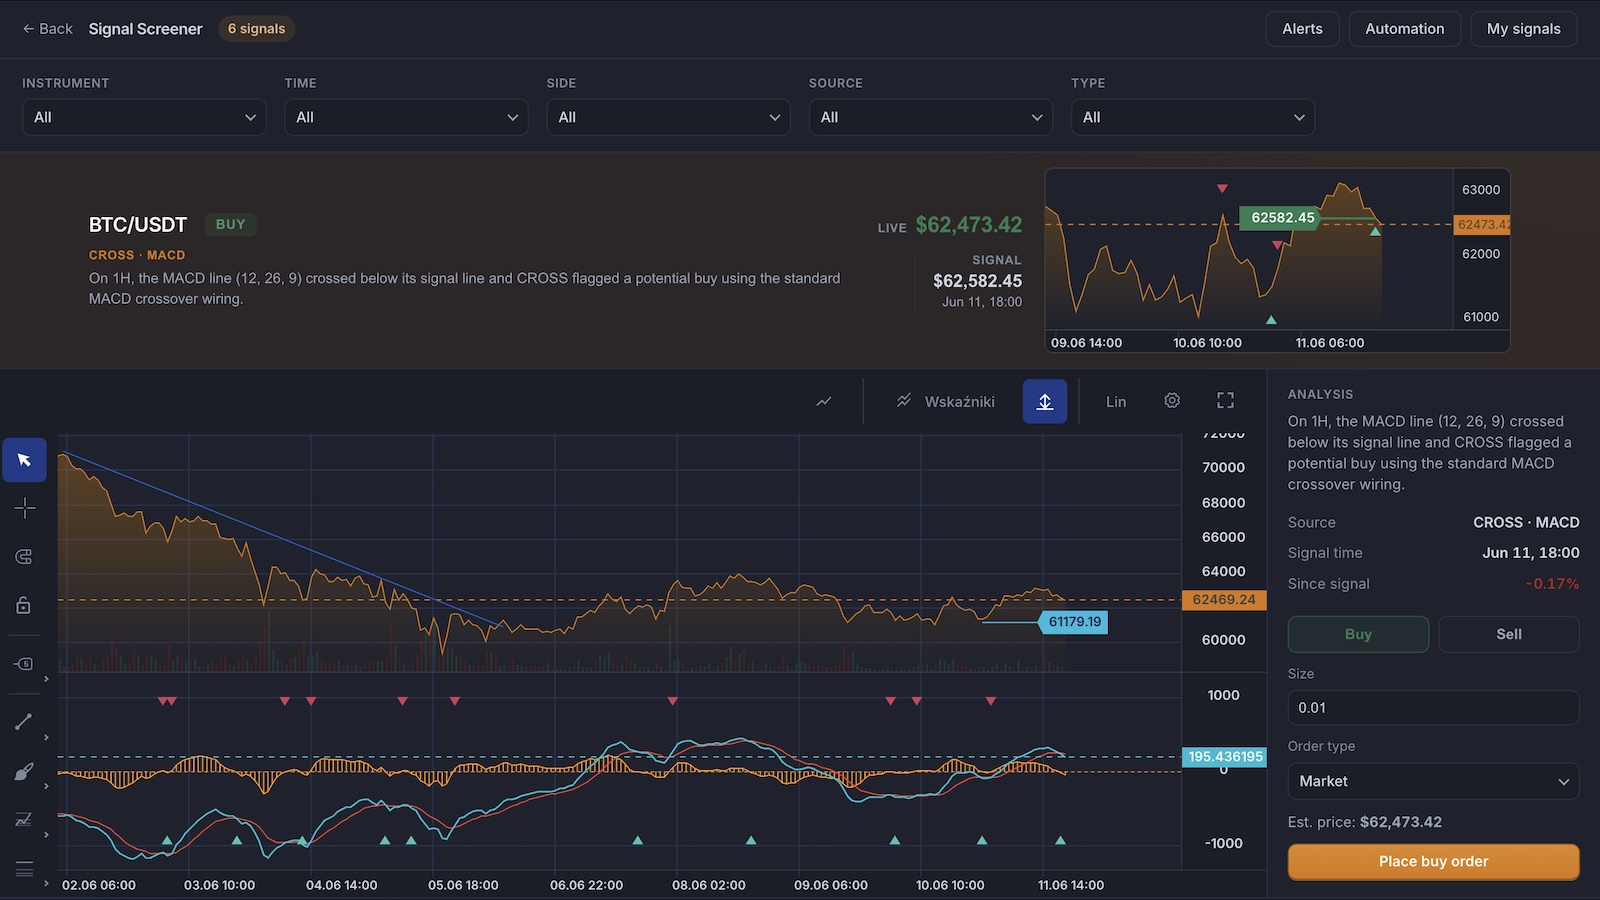
Signal screener with filters, mini charts, expandable analysis, trade panel, and alert/automation settings.

Open live screener
Signal screener with filters, expandable chart analysis, and trade panel

Stack

  • Vite + React
  • ChartUI
  • Binance (public API)
  • Copy-paste starter zip

Highlights

  • Run locally with npm install && npm run dev
  • Built-in strategy scripts (CROSS, EXCEED, MACD)
  • Signal markers on the main series
  • Step-by-step guide in the For developers section

For developers

This page is your starting point: try the live screener, download a small React project, run it on your machine, then connect your signal backend. Follow the steps below and edit one file at a time.

Get started in five steps

You do not need to understand the whole docs repo — download the zip, run it, then iterate.

  1. 1
    See the finished app

    Open the live signal screener in another tab. Filters, mini charts, expandable analysis, and alert settings — no install yet.

  2. 2
    Download the starter project

    Scroll to Starter code below and click Download ZIP. You get a ready-made Vite + React project — no need to clone this docs repo.

  3. 3
    Install dependencies

    Unzip the folder, open your terminal app (Terminal on Mac, PowerShell on Windows), cd into the folder, and run npm install. You need Node.js 18+.

  4. 4
    Run it locally

    Run npm run dev. Your browser will show a local URL (usually http://localhost:5173) — open it. The chart should load with live Binance candles and strategy markers (CROSS, EXCEED).

  5. 5
    Start changing things

    Swap mock signals for your API, tune filters and row layout, and connect automation when you are ready. See key strategies for marker behavior.

What already works vs what you add later

The live app is a real chart UI with public market data and built-in strategy scripts. Signal ranking, copy, and execution hooks are yours to connect.

Live from Binance

Works as soon as you run the project

Candles, crosses, and mini-chart updates without API keys.

  • 1H SMA cross signals from Binance candles
  • Mini charts with live price updates
  • Expandable chart with strategy markers
  • Filter bar (instrument, time, side, source)
How Binance data works →
Demo only

Illustrative signal feed — not investment advice

Use the layout and chart wiring; replace catalog data with your product logic.

  • Mock signal catalog and reasoning copy
  • Paper trade ticket in the expanded row
  • Alert / automation settings drawer

Starter code

Download a zip, or copy a snippet into your own app. The zip includes src/App.tsx with ChartUI and built-in strategy markers, plus extra examples in snippets/ for chart-only and signal-feed layouts.

Pick one example to view or copy:

Adds toolbar, themes, and drawing tools.

import { useEffect, useRef, useState } from "react";
import { createChart, type ChartInstance } from "@efixdata/exeria-chart";
import { ChartUI } from "@efixdata/exeria-chart-ui-react";
import { BinanceAdapter } from "@efixdata/connector-binance";

const SYMBOL = "BTCUSDT";
const INTERVAL = "1h";

export default function App() {
  const containerRef = useRef<HTMLDivElement | null>(null);
  const [chart, setChart] = useState<ChartInstance | null>(null);

  useEffect(() => {
    const container = containerRef.current;
    if (!container) return;

    let disposed = false;
    const adapter = new BinanceAdapter();
    const instance = createChart({
      container,
      instrument: { symbol: SYMBOL, description: "BTC/USDT" },
      themeVariant: "dark",
      dataAdapter: adapter,
    });

    instance.init();
    instance.setMainDrawMode("OHLC");

    void (async () => {
      await instance.loadData(SYMBOL, { interval: INTERVAL, limit: 1000 });
      await instance.addScript("MACD");
      await instance.addScript("CROSS");
      await instance.addScript("BBAND");
      await instance.addScript("EXCEED");
      instance.subscribeToUpdates(SYMBOL);
      if (!disposed) setChart(instance);
    })();

    return () => {
      disposed = true;
      instance.unsubscribeFromUpdates();
      adapter.disconnect?.();
      instance.destroy();
    };
  }, []);

  return (
    <main style={{ height: "100vh", background: "#0b0c10" }}>
      <ChartUI chart={chart}>
        <div ref={containerRef} style={{ width: "100%", height: "100%" }} />
      </ChartUI>
    </main>
  );
}

Commands to run in your terminal

# After downloading and unzipping the starter from this page:

cd exeria-screener-signals   # or whatever you named the folder
npm install
npm run dev

Next: Key strategies · Live data stream

Scroll to For developers to download the ZIP or copy snippets, then wire your screener or alert backend when you are ready. More recipes in the tutorials.